Let’s show you how to replace the screen on an iPhone 6. Here we have the iPhone 6. I’m going to go ahead and turn it off, grab my Pentalobe screwdriver, and take out the two little screws in the bottom. These are the same size screws as all of the other iPhones.
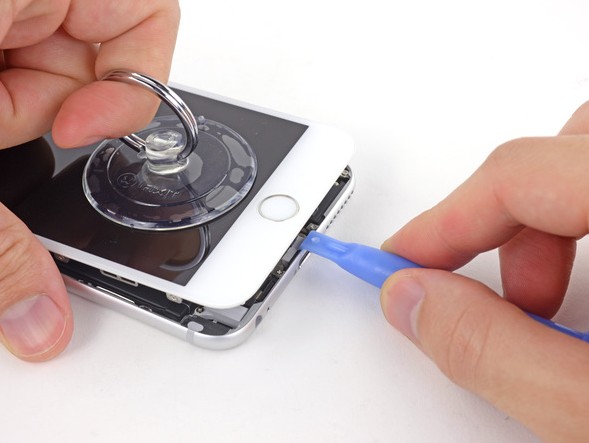
I’m going to take a suction cup and lift up the screen just a little bit, so I can slip a pry tool. You can use a plastic one or a metal one if you want. Just make sure to lift up on the actual metal frame of the screen otherwise you might crack it as you pry it up. So be super careful with that.
As you lift up the screen you’ll see these five screws on the metal plate. Take out those screws, remove the plate, and then unsnap each of these little clasps. The clasps are very similar to legos. Just kind of take your little pry tool, pop them underneath, and they’ll unclasp from the little latch that they’re on.
Anyway this is the screen. There’s a very good chance that when you buy the replacement screen you’re going to have to move over all the individual parts from one screen to the other.
We’re going to start with the earpiece. There’s three screws up at the top. Take out those screws and then the little bracket comes off. Put that somewhere safe. Make sure you keep all your screws really organized or you’re going to have problems later.
I’m pulling up the front camera and the proximity sensor from the little brackets that they’re held in, and then I’m pulling off the last little bit that’s taped down by the earpiece. These parts are really inexpensive. At least they have been in the past with the iPhone 5’s and 4’s.
There’s three screws on both sides of the metal plate and then one screw down at the bottom. So take those out and there’s two screws that hold the home button in place. Remove that bracket. And then the home button is just lightly taped down. It’s just lightly stuck. So peel that up.
And there’s one little connector right there just like the little connectors that were holding the screen down, those little lego pieces. So un-pop that and remember that this is the only home button, the one that comes with your phone, that will work with the fingerprint scanner.
Any other aftermarket home buttons that you put on the phone will not work with the fingerprint scanner, they’ll just work as a home button. So keep that in mind.
Easy Way To Replace The Screen Of An iPhone 6
Anyway, lift it off the metal plate. You can see the ribbing cable that connects the home button up by the earpiece. And this is the screen. And there’s a good chance you might need to move over the plastic brackets from one screen to the other, so they just pop right out. And when you put them back in, you don’t need to worry about gluing them down or anything because the actual ribbing cable will hold them in the correct place that they need to be.
And you’ll see that here in a second. Anyway, I’m going to grab the earpiece ribbing cable and put that back in, lining it up with a little peg up at the top. It’s really easy not to mess this up because there’s little guiding pegs that the ribbing cables sit on top of. And then each little component has its own little slot up at the top so you can just kind of see where each little piece goes.
The earpiece is going to go down over the top of the camera and the proximity sensor and those gold little connections points will fold right over the top of the earpiece. And the camera will go in its slot. Once the camera is in there you can take your back plate and slide it up over that ribbing cable for the LCD, and line it up with the hole and then you can grab the bracket for the camera and put it over the top as well.
Remember those three screws that hold that down, and then we can start with the home button. It should still be relatively sticky from before. Either way, just put it down in place over the hole. And then fold over that little lego piece and snap that in place just like a lego.
And then you can grab your bracket, screw that in with the two screws. And then there’s seven screws around the side of that metal plate so make sure those are in as well. Now we’re going to take the screen and plug each of those little connectors in, there’s four of them.
So kind of work your way down. You’ll feel it seat on top of the little plug, and then you can just press it down the rest of the way. Very similar to legos. Get all four of those in and then while the screen is still up you can go ahead and turn your phone on just to make sure that it’s working.
So make sure that the touch sensitivity is working and the LCD is working and then turn the phone off before you do anything else. Put the metal bracket back into place. You got those five screws. And then you can fold your screen down and press it into place. So make sure that you start with the top of the screen and slide it up and into the little groove so that it’s super flush with the edge of the phone. And then you can press the edges in as you go down, around, and towards the charging port. Make sure you put those bottom two Pentalobe screws in, and there you go. Now you know how to replace the screen on an iPhone6