How To Lay Wall and Floor Tiles Video Transcript
Hi I’m Craig Philips and welcome to my Tiling Trade Tips where I’m going to be revealing my top DIY secrets to help you save money and time.
I’m going to be showing you how to set out and lay floor tiles. Now once you’ve decide what size and style tile that you want to lay your floor in you need to find a starting point.
This is very important, the first tile that you lay dictates where the rest of them are going to go in the room. What we would recommend is find the dead centre of the room and work your way out so you’ve got equal cuts either side.
Now of course everybody’s rooms are different sizes at home so measure from wall to wall.
This area is only 1200mm so I’m going to mark it 600, dead centre. I’m going to get my first tile, on one edge of it and place it on the dead centre of the room and what you might find is when you lay tiles out to start with, just dry with no adhesive on you pace them out and then all of a sudden you’ve got a real small slither of a cut in the corner which is what you don’t want so, keeping to the centre of your room you know have to find the centre of your tile place that across so it’s travelling 50 50 and then if you start to work your way out with your dry tiles you’ll see you’ve now got a larger cut either side which is equal size and it’s a perfect starting point.
So now you’ve drawn a line right the way down the centre for the width of the room you have to do the same with the length. Now we’ve measured and marked up the centre of the length of the room and the width of the room we’ve got our starting point for the first tile.
We’re fitting our tiles down to a marine ply so we’re using a rapid set flexible adhesive. Now I’m using a notched floor tile. Now I start to spread the adhesive with the straight edge of the trowel then I turn this around to the notched edge and comb it out so I got an even bed.
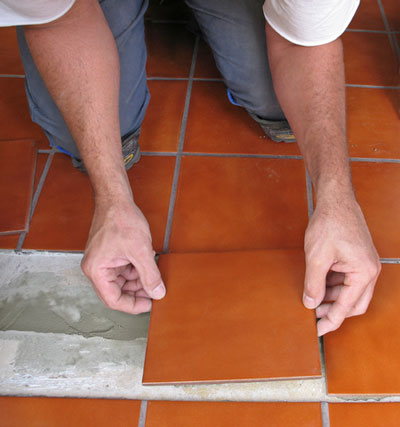
Now the first tile is laid down onto the adhesive making sure that the marks that you made on the tile line up perfectly with the marks that you made on the floor. Putting a small bit of pressure on all four corners of the tile.
Now your next tile can be laid into position again putting a small amount of pressure on all four corners checking with your finger that it’s flush with the tile next to it and not forgetting your tile spacers.
Carry on laying your tiles till you get to the edge of the room then you can measure up and prepare for the cut. Once you’ve got three or four tiles into position its always wise to use a spirit level to check that they are all bedded flush.
Now you’ve fitted all your floor tiles, you’ll be able to see you’ve got equal cuts all the way around the out side. You can use a sponge to wipe off any excess adhesive and then of course leave it to fully cure and then your ready to start grouting.
More Tile Laying Tutorials
How to Cut and Tile around Electrical Sockets and Light Switches
How to Cut Porcelain and Ceramic Floor Tiles
Tile Floor Layout and Installation – Today we’re going to discuss getting a proper layout for your tile project. Now, the layout is key to making sure you get a professional looking install. I want to see as many full tiles as possible and avoid any sliver cuts.
Where To Start Tiling
How To Tile A Wall
Calculating Tiles and Planning Your Layout – Marking out Floors
How to Tile a Floor | Mitre 10 Easy As
How to tile a floor part 1: preparation
Important Tile Layout Tips, You Need To Know – Contractor Secrets
How To Lay Wall and Floor Tiles
How to Lay a Tile Floor – DIY Network
How to Lay Tile Over Concrete
Floor Tile Layout – Part 1 – Floor Tile Alignment
How to Tile a Kitchen Floor
How to Tile a Bathroom: DIY Tiling Made Easy